Intro
LeetCode 의 코딩 문제들을 풀다보면 자주 나오는 Node 계열 클래스들이 있습니다.
대표적으로 TreeNode와 ListNode 등이 있는데요.
처음 이런 문제를 접할 때에는 너무 당황해서 어떻게 풀어야 할지도 모르고 테스트 코드를 작성하기도 참 막막 한데요, 지금은 어느정도 익숙 해 졌다 보니 묵묵히 inner class로 복사해 집어 넣은 후에 코드를 작성 하기 시작합니다.
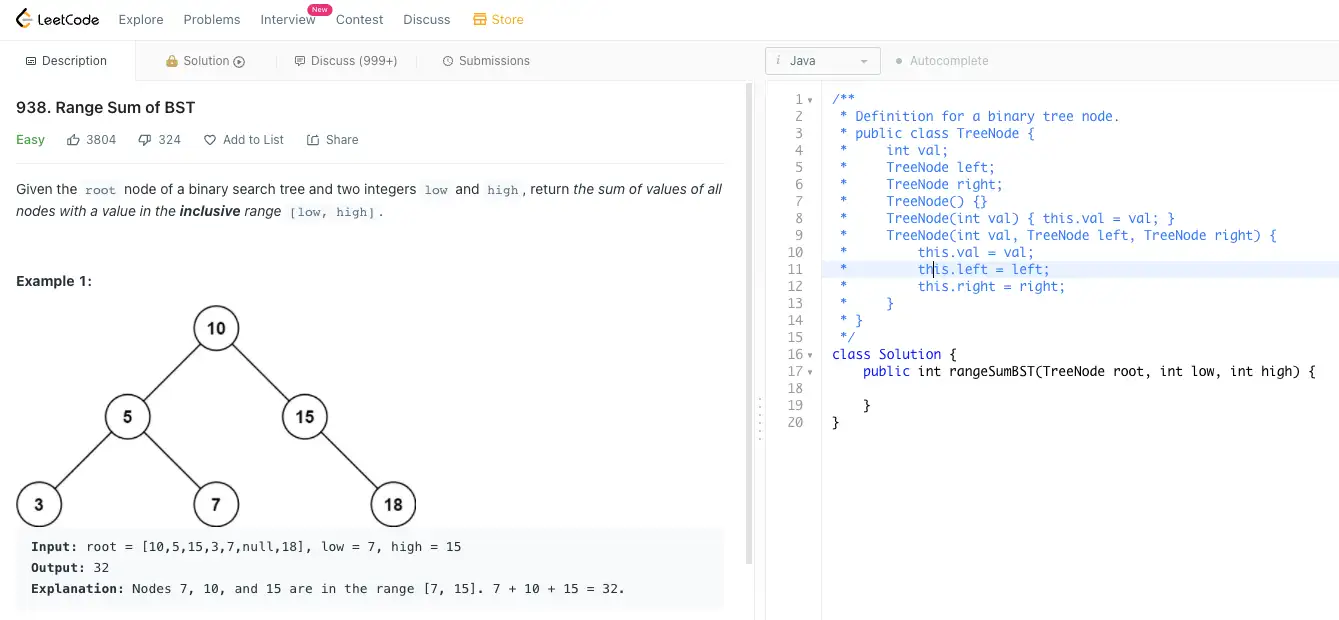
- TreeNode 예제 문제
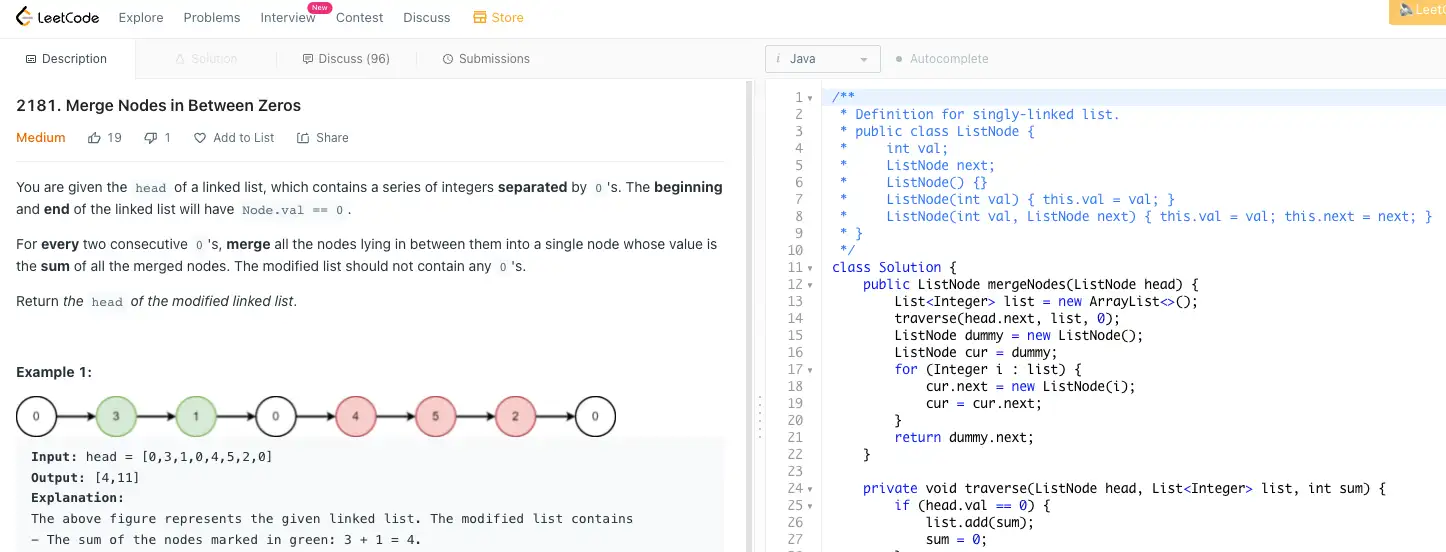
- ListNode 예제 문제
하지만 매번 같은 코드를 복사해서 이너클래스로 넣어서 만드는 것도 번거롭고 특히 테스트 코드를 작성하기가 꽤나 까다롭다 보니 Node 클래스를 테스트에 용이하게 확장시켜서 작성해 두고 사용해야 겠다는 생각을 꾸준히 해왔습니다.
보통 코드문제를 풀 때는 시간날때 마다 잠깐씩만 하다 보니 코드 확장까지 할 시간이 잘 안났었는데요, 이번주말엔 처음으로 LeetCode Weekly Contest / Biweekly Contest에 모두 참여해보기로 해서 Problem solving에만 집중하다 보니 시간을 낼 수 있었습니다.
첫 참여에 3개의 문제를 풀어서 개인적으로 어느정도는 만족스러웠는데 후에 Leaderboard를 확인 하니 10분만에 다 풀고 나간 사람들이 보여 참 씁쓸했습니다.

사실 처음 코드확장을 생각했을때는 정말 간단할 줄 알았는데, 작성하다 보니 BFS, DFS, traversal, stack, queue 등 지금까지 코딩 문제들을 풀어보며 접했던 대부분의 알고리즘들의 종합 선물 세트 같은 느낌이라 마냥 쉽지도 않았고 시간도 제법 걸렸기 때문에 이걸 공유하면 다른 분들에게도 도움이 되겠다는 생각이 들어 포스팅 하게 되었습니다.
ListNode 보다는 TreeNode가 더 복잡하며 코드 확장에 필요한 base가 크게 다르지 않기 때문에 TreeNode만 다루어 볼 생각입니다. 혹시 LeetCode에서 코드 풀이를 즐겨 하시는 분들 중 당장 이해가 어려운 분이 계시다면, TreeNode 클래스를 코드 풀이 프로젝트에 일단 추가해놓고 이걸 활용해 쉬운 문제부터 풀며 차근차근 이해를 높인 뒤에 추후에 본인만의 TreeNode 클래스를 새로 작성해 보시면 도움이 될 거라고 생각합니다.
TreeNode.java
기본 코드
LeetCode에서 제공해주는 TreeNode 클래스는 다음과 같습니다.
/**
 * Definition for a binary tree node.
 * public class TreeNode {
 *     int val;
 *     TreeNode left;
 *     TreeNode right;
 *     TreeNode() {}
 *     TreeNode(int val) { this.val = val; }
 *     TreeNode(int val, TreeNode left, TreeNode right) {
 *         this.val = val;
 *         this.left = left;
 *         this.right = right;
 *     }
 * }
 */
사실 이게 가장 큰 문제가 뭐냐면, 문제를 제공 해 줄 때는 완성된 TreeNode 클래스를 제공 해 주는게 아닌 배열 형태로 root를 제공해 줍니다.
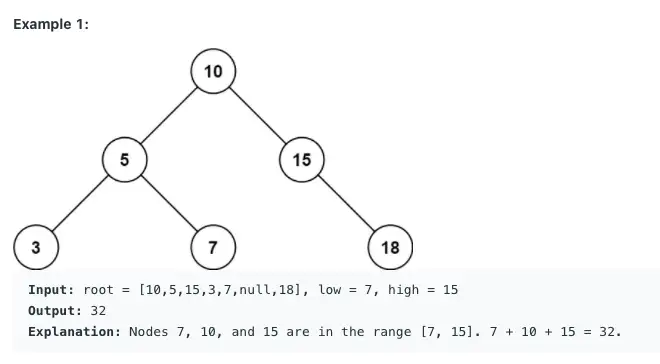
이렇게 되면, 10을 루트로 하는 TreeNode를 작성하기 위해서는
TreeNode root = new TreeNode(10);
root.left = new TreeNode(5);
root.right = new TreeNode(15);
root.left.left = new TreeNode(3);
root.left.right = new TreeNode(7);
root.right.right = new TreeNode(18);
Assertions.assertThat(rangeSumBST(root, 7, 15)).isEqualTo(32);
이와 같이 배열의 숫자를 보며 하나씩 TreeNode를 생성해 가며 적절한 위치에 붙여 줘야 합니다. 사람이 눈으로 확인하며 하나씩 작성하다 보니 중간에 실수를 할 수도 있습니다.
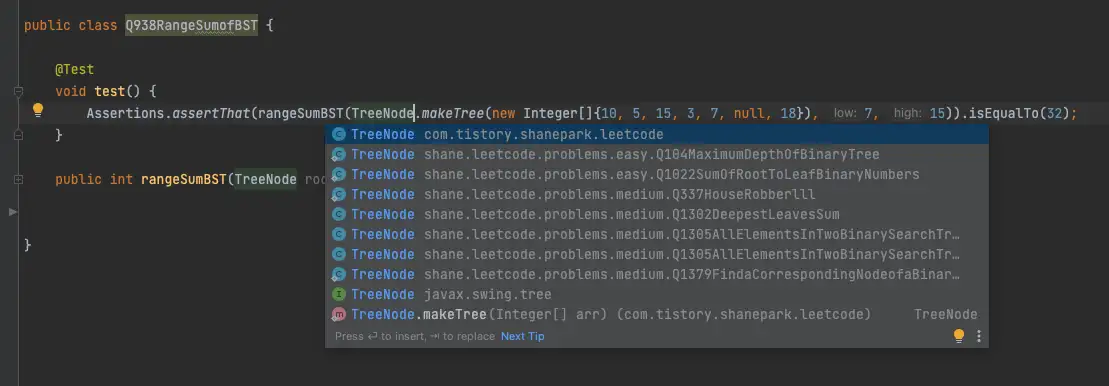
하지만 제가 확장해둔 코드를 활용 한다면 위의 테스트 코드가 단 한줄로 줄어듭니다. 제공받은 배열을 활용해 트리를 생성합니다.
Assertions.assertThat(rangeSumBST(TreeNode.makeTree(new Integer[]{10, 5, 15, 3, 7, null, 18}), 7, 15)).isEqualTo(32);
이 외에도 몇가지 문제 풀이 및 테스트에 용이 할 수 있도록 코드를 확장 해 두었습니다.
코드 전문
먼저 제가 작성한 코드 전문을 통해 확장된 기능들을 한 눈에 확인 해 보겠습니다.
package com.tistory.shanepark.leetcode;

import java.util.*;

/**
 * This class was written to help leetcode TreeNode problems testing.
 * <p>
 * Author: Shane
 */
public class TreeNode {

    public int val;
    public TreeNode left;
    public TreeNode right;

    public TreeNode() {
    }

    public TreeNode(int val) {
        this.val = val;
    }

    public TreeNode(int val, TreeNode left, TreeNode right) {
        this.val = val;
        this.left = left;
        this.right = right;
    }

    public TreeNode(Integer[] arr) {
        List<TreeNode> list = new ArrayList<>();
        this.val = arr[0];
        for (Integer integer : arr) {
            list.add(integer == null ? null : new TreeNode(integer));
        }

        if (arr.length > 1) {
            this.left = list.get(1);
        }
        if (arr.length > 2) {
            this.right = list.get(2);
        }

        for (int i = 3; i < arr.length; i++) {
            if (i % 2 == 0) {
                list.get((i - 1) / 2).right = list.get(i);
            } else {
                list.get((i - 1) / 2).left = list.get(i);
            }
        }
    }

    public int getMaxDepth() {
        return depthDFS(this, 1);
    }

    public static TreeNode makeTree(Integer[] arr) {
        if (arr.length == 0)
            return null;
        TreeNode node = new TreeNode(arr[0]);

        for (int i = 1; i < arr.length; i++) {
            if (arr[i] == null)
                continue;
            Stack<Boolean> isLeftStack = new Stack<>();
            int cur = i;
            while (cur > 0) {
                int head = (cur - 1) / 2;
                boolean isLeft = (head == 0) ? cur == 1 : (cur - 1) % (head * 2) == 0;
                isLeftStack.push(isLeft);
                cur = head;
            }

            traverse(node, isLeftStack, arr[i]);
        }
        return node;

    }

    public void printTree() {
        Queue<TreeNodeWithDepth> q = new LinkedList<>();
        int maxDepth = this.getMaxDepth();
        q.offer(new TreeNodeWithDepth(this, 1));
        int index = 0;
        while (!q.isEmpty()) {
            TreeNodeWithDepth cur = q.poll();
            int depth = cur.depth;
            TreeNode node = cur.node;
            System.out.printf("[%2d] %s\n", index++, (node == null ? "null" : node.val));
            if (node != null && depth < maxDepth) {
                q.add(new TreeNodeWithDepth(node.left, depth + 1));
                q.add(new TreeNodeWithDepth(node.right, depth + 1));
            }
        }
    }

    private int depthDFS(TreeNode node, int depth) {
        if (node == null)
            return depth - 1;
        return Math.max(depthDFS(node.left, depth + 1), depthDFS(node.right, depth + 1));
    }

    private static void traverse(TreeNode node, Stack<Boolean> isLeftStack, int value) {
        boolean isLeft = isLeftStack.pop();
        if (isLeftStack.isEmpty()) {
            if (isLeft) {
                node.left = new TreeNode(value);
            } else {
                node.right = new TreeNode(value);
            }
            return;
        }

        traverse(isLeft ? node.left : node.right, isLeftStack, value);
    }

    static class TreeNodeWithDepth {
        TreeNode node;
        int depth;

        public TreeNodeWithDepth(TreeNode node, int depth) {
            this.depth = depth;
            this.node = node;
        }
    }

}
static TreeNode makeTree()
public static TreeNode makeTree(Integer[] arr) {
  if (arr.length == 0)
    return null;
  TreeNode node = new TreeNode(arr[0]);

  for (int i = 1; i < arr.length; i++) {
    if (arr[i] == null)
      continue;
    Stack<Boolean> isLeftStack = new Stack<>();
    int cur = i;
    while (cur > 0) {
      int head = (cur - 1) / 2;
      boolean isLeft = (head == 0) ? cur == 1 : (cur - 1) % (head * 2) == 0;
      isLeftStack.push(isLeft);
      cur = head;
    }

    traverse(node, isLeftStack, arr[i]);
  }
  return node;

}
배열의 길이가 0인 경우에는 TreeNode를 만들 수 없기 때문에 null을 반환 합니다.
사실 처음에는 Integer 배열을 파라미터로 받는 생성자를 먼저 만들어 보려 했지만, 이 null 반환 때문에 생성자로 만들지 못하고 static 메서드로 만들게 되었습니다. 모두 아시는 것 처럼 생성자는 null을 반환 할 수가 없습니다. 생성자로 바꾸려면 Exception을 발생시켜서 해야 겠습니다.
makeTree가 가장 필요한 기능이었지만 구현하면서도 가장 골치가 아팠습니다. 구현에 여러가지 방법이 있을 수 있겠지만 제가 해결 한 방법은, 현 트리 위치에서 루트까지 위로 하나씩 올라가며
index를 기준으로 해당 index의 head 번호는
(index-1) /2이며,index-1을head*2로 나눈 나머지가 0이면 index의 위치는 head의 왼쪽 노드, 1이면 head의 오른쪽 노드 입니다.
올라온 방향(왼쪽에서 올라왔는지 오른쪽에서 올라왔는지)를 stack에 꾸준히 쌓아 기억합니다. 그래서 마침내 root에 도착 했을때는 이제 반대로 스택을 하나씩 꺼내며 traverse 메서드로 원래 자리를 찾아 가서는 필요한 곳에 TreeNode를 생성해 붙이는 방식으로 구현 했습니다. 가장 나중에 쌓은 방향부터 꺼내며 찾아가야 하기 때문에 FIFO 방식의 Stack을 사용했습니다.
헨델과 그레텔에서 그들이 돌아갈 길을 찾기 위해 빵 부스러기(Bread crumb)를 하나씩 떨어뜨려 둔 것을 생각 하면 이해가 편합니다. 왔던 길을 다시 되돌아간다면 가장 최근에 떨어뜨렸던 빵 부스러기 부터 시작해서 가장 처음에 떨어뜨려둔 빵을 찾아가는 순서가 되겠지요. 다행인건 길바닥이 아닌 Stack에 담아두었기 때문에 새들이 다 먹어버릴 일은 없겠네요.
private void static traverse()
private static void traverse(TreeNode node, Stack<Boolean> isLeftStack, int value) {
  boolean isLeft = isLeftStack.pop();
  if (isLeftStack.isEmpty()) {
    if (isLeft) {
      node.left = new TreeNode(value);
    } else {
      node.right = new TreeNode(value);
    }
    return;
  }

  traverse(isLeft ? node.left : node.right, isLeftStack, value);
}
Stack을 하나씩 소모 하며 배열상의 i번째 인덱스에 해당하는 값이 들어갈 자리를 찾아 가서는 필요한 곳에 TreeNode를 만들어 붙이는 메서드 입니다. 내부적으로만 사용합니다.
Constructor
public TreeNode(Integer[] arr) {
  List<TreeNode> list = new ArrayList<>();
  this.val = arr[0];
  for (Integer integer : arr) {
    list.add(integer == null ? null : new TreeNode(integer));
  }

  if (arr.length > 1) {
    this.left = list.get(1);
  }
  if (arr.length > 2) {
    this.right = list.get(2);
  }

  for (int i = 3; i < arr.length; i++) {
    if (i % 2 == 0) {
      list.get((i - 1) / 2).right = list.get(i);
    } else {
      list.get((i - 1) / 2).left = list.get(i);
    }
  }
}
이번에는 Integer 배열을 파라미터로 받는 생성자 입니다.
위에서의 makeTree와는 다른 방식으로 구현 해 보았는데요, 성능상 이쪽이 훨씬 유리할 거라 생각됩니다.
위에서처럼 Stack을 따로 모으지 않고, index가 header의 정보를 담고 있다는 걸 이용했습니다.
- List
를 만들어 파라미터로 받은 배열을 순회하며 모두 TreeNode로 만들어 list에 추가 해 둔 후에 - 다시 list 를 순회 하며 자신의 parent를 List의
(i-1)/2)번째 에서 받아서 인덱스가 짝수이면 오른쪽, 홀수이면 왼쪽에 담습니다.
public int getMaxDepth()
public int getMaxDepth() {
  return depthDFS(this, 1);
}
트리의 최대 깊이를 찾아주는 메서드 입니다. 깊이 우선 탐색으로 모든 노드를 순회해 최대 깊이를 찾아냅니다.
private int depthDFS(TreeNode node, int depth) {
    if (node == null)
        return depth - 1;
    return Math.max(depthDFS(node.left, depth + 1), depthDFS(node.right, depth + 1));
}
maxDepth는 트리 출력 메서드를 만들려다 보니 null 처리 때문에 정확한 출력을 위해 필요했습니다. 이왕 만든거 외부에서 사용 할 수도 있겠다 싶어 public 메서드로 빼 두었습니다.
public void printTree()
public void printTree() {
  Queue<TreeNodeWithDepth> q = new LinkedList<>();
  int maxDepth = this.getMaxDepth();
  q.offer(new TreeNodeWithDepth(this, 1));
  int index = 0;
  while (!q.isEmpty()) {
    TreeNodeWithDepth cur = q.poll();
    int depth = cur.depth;
    TreeNode node = cur.node;
    System.out.printf("[%2d] %s\n", index++, (node == null ? "null" : node.val));
    if (node != null && depth < maxDepth) {
      q.add(new TreeNodeWithDepth(node.left, depth + 1));
      q.add(new TreeNodeWithDepth(node.right, depth + 1));
    }
  }
}
Tree 를 출력 하는 메서드 입니다. 디버깅을 편하게 하기 위해 추가 해 두었습니다.
root 부터 하나씩 깊이를 추가해가며 출력하기 위해 너비 우선 탐색(DFS)로 작성하였고, 최대 깊이가 아닐 경우에는 null 이 있을때 출력을 안하고 넘어가는 걸로 끝나지 않고, NULL을 정확히 출력 해 내기 위해서는 해당 TreeNode의 깊이도 Queue에 함께 담아야 할 필요가 있어 TreeNodeWithDepth 라는 내부 클래스를 하나 생성 하여 처리했습니다.
테스트 코드
이제 확장시켜 작성한 TreeNode 코드가 의도한 대로 잘 작동하는지 확인하기 위한 테스트 코드 입니다.
사실 테스트 코드를 먼저 작성하며 메서드 이름을 정한 후에 테스트가 정상 작동 하도록 코드를 채워 넣었습니다.
package com.tistory.shanepark.leetcode;

import org.assertj.core.api.Assertions;
import org.junit.jupiter.api.Test;

import static org.assertj.core.api.Assertions.assertThat;


class TreeNodeTest {

    @Test
    void getMaxDepth() {
        Assertions.assertThat(TreeNode.makeTree(new Integer[]{10, 5, 15, 3, 7, null, 18}).getMaxDepth()).isEqualTo(3);
    }

    @Test
    void constructor() {
        TreeNode root = new TreeNode(new Integer[]{10, 5, 15, 3, 7, null, 18});
        assertThat(root.val).isEqualTo(10);
        assertThat(root.left.val).isEqualTo(5);
        assertThat(root.right.val).isEqualTo(15);
        assertThat(root.left.left.val).isEqualTo(3);
        assertThat(root.left.right.val).isEqualTo(7);
        assertThat(root.right.left).isNull();
        assertThat(root.right.right.val).isEqualTo(18);

        root = new TreeNode(new Integer[]{0, 1, 2, 3, 4, 5, 6, 7, 8, 9, 10, 11, 12, 13, 14});
        assertThat(root.val).isEqualTo(0);
        assertThat(root.left.val).isEqualTo(1);
        assertThat(root.right.val).isEqualTo(2);
        assertThat(root.left.left.val).isEqualTo(3);
        assertThat(root.left.right.val).isEqualTo(4);
        assertThat(root.right.left.val).isEqualTo(5);
        assertThat(root.right.right.val).isEqualTo(6);
        assertThat(root.left.left.left.val).isEqualTo(7);
        assertThat(root.left.left.right.val).isEqualTo(8);
        assertThat(root.left.right.left.val).isEqualTo(9);
        assertThat(root.left.right.right.val).isEqualTo(10);
        assertThat(root.right.left.left.val).isEqualTo(11);
        assertThat(root.right.left.right.val).isEqualTo(12);
        assertThat(root.right.right.left.val).isEqualTo(13);
        assertThat(root.right.right.right.val).isEqualTo(14);
    }

    @Test
    void makeTree() {
        TreeNode root = TreeNode.makeTree(new Integer[]{10, 5, 15, 3, 7, null, 18});
        assertThat(root.val).isEqualTo(10);
        assertThat(root.left.val).isEqualTo(5);
        assertThat(root.right.val).isEqualTo(15);
        assertThat(root.left.left.val).isEqualTo(3);
        assertThat(root.left.right.val).isEqualTo(7);
        assertThat(root.right.left).isNull();
        assertThat(root.right.right.val).isEqualTo(18);


        root = TreeNode.makeTree(new Integer[]{0, 1, 2, 3, 4, 5, 6, 7, 8, 9, 10, 11, 12, 13, 14});
        assertThat(root.val).isEqualTo(0);
        assertThat(root.left.val).isEqualTo(1);
        assertThat(root.right.val).isEqualTo(2);
        assertThat(root.left.left.val).isEqualTo(3);
        assertThat(root.left.right.val).isEqualTo(4);
        assertThat(root.right.left.val).isEqualTo(5);
        assertThat(root.right.right.val).isEqualTo(6);
        assertThat(root.left.left.left.val).isEqualTo(7);
        assertThat(root.left.left.right.val).isEqualTo(8);
        assertThat(root.left.right.left.val).isEqualTo(9);
        assertThat(root.left.right.right.val).isEqualTo(10);
        assertThat(root.right.left.left.val).isEqualTo(11);
        assertThat(root.right.left.right.val).isEqualTo(12);
        assertThat(root.right.right.left.val).isEqualTo(13);
        assertThat(root.right.right.right.val).isEqualTo(14);
    }

    @Test
    void printTree() {
        TreeNode root = TreeNode.makeTree(new Integer[]{0, 1, 2, 3, 4, 5, 6, 7, 8, 9, 10, 11, 12, 13, 14});
        root.printTree();
    }

}
코드풀이 프로젝트에 추가
이제 위에서 열심히 만든 코드를 코딩테스트 문제를 풀이하는 프로젝트에 추가해 주면 되겠습니다.
사실 간단하게 위의 전문에 작성한 TreeNode.java 코드를 통째로 생성해서 프로젝트에 추가 해 두면 바로 사용 할 수 있습니다.
하지만 후에 더 확장을 하고, 다른 프로젝트에서도 참조할 수 있게 하기 위해 Maven Repository에 등록을 해 두었는데요

저는 shaneutils라는 저장소를 만들어 코딩 테스트에 도움이 되는 유틸들을 등록 해 두고 있습니다.
maven 혹은 gradle에서 의존성을 추가해 바로 사용 할 수 있는데요. 아래의 내용을 각각 build.gradle이나 pom.xml 에 추가 해 주시면 됩니다.
Gradle
allprojects {
  repositories {
    ...
    maven { url 'https://jitpack.io' }
  }
}
dependencies {
  ...
  implementation 'com.github.Shane-Park:shaneutils:master-SNAPSHOT'
}
Maven
<repositories>
  <repository>
    <id>jitpack.io</id>
    <url>https://jitpack.io</url>
  </repository>
</repositories>

<dependency>
  <groupId>com.github.Shane-Park</groupId>
  <artifactId>shaneutils</artifactId>
  <version>master-SNAPSHOT</version>
</dependency>
나만의 라이브러리를 만들어 maven repository에 등록 하는 방법에 대해 궁금하면 아래의 링크를 참고 해 주세요.
의존성을 추가 한 후에는 com.tistory.shanepark.leetcode 에 있는 확장된 TreeNode 클래스를 사용 하실 수 있습니다.
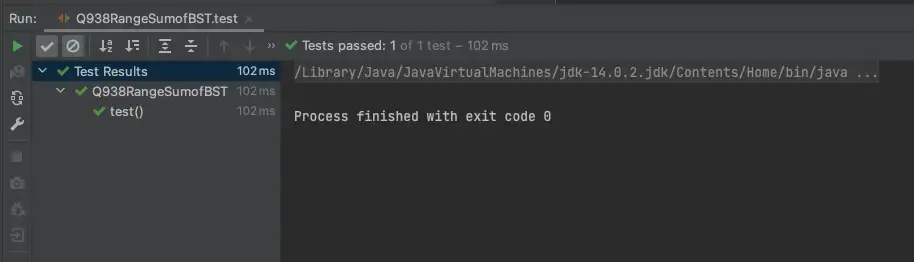
그럼 이제 불러온 코드를 활용 해 간단하게 테스트 코드를 작성 할 수 있습니다.
package shane.leetcode.problems.easy;

import com.tistory.shanepark.leetcode.TreeNode;
import org.assertj.core.api.Assertions;
import org.junit.jupiter.api.Test;

public class Q938RangeSumofBST {

    @Test
    void test() {
        Assertions.assertThat(rangeSumBST(TreeNode.makeTree(new Integer[]{10, 5, 15, 3, 7, null, 18}), 7, 15)).isEqualTo(32);
        Assertions.assertThat(rangeSumBST(TreeNode.makeTree(new Integer[]{10, 5, 15, 3, 7, 13, 18, 1, null, 6}), 6, 10)).isEqualTo(23);
    }

    public int rangeSumBST(TreeNode root, int low, int high) {
        if (root == null)
            return 0;
        int sum = (low <= root.val && root.val <= high) ? root.val : 0;

        if (root.val > low) {
            sum += rangeSumBST(root.left, low, high);
        }
        if (root.val < high) {
            sum += rangeSumBST(root.right, low, high);
        }
        return sum;
    }

}
LeetCode 문제 풀이를 취미로 하시는 분들이라면 꼭 사용해보시길 추천드립니다!
감사합니다.
'Development > Problem Solving' 카테고리의 다른 글
| [Java] Counting Sort 밤하늘의 Perl (0) | 2023.01.24 |
|---|---|
| Leetcode) 소개 및 풀이 코드 Github에 자동 커밋방법 (0) | 2022.01.16 |
| 문제풀이: 가장 긴 팬린드롬(palindrome) (0) | 2021.12.18 |
| JAVA로 알아보는 힙 (Heap) 자료구조 (0) | 2021.10.16 |
| 피보나치 수열과 프로그래머스 땅따먹기 문제로 알아보는 Dynamic Programming (동적 프로그래밍) (0) | 2021.07.31 |